

Tuesday, July 24, 2012
Rules for Arranging Modules on cntraral rack | Learning PLC/Automation in Bangladesh
Rules for Arranging Modules on cntraral rack | Learning PLC/Automation in Bangladesh
!--RELATED-POSTS-STARTS-->
Friday, July 13, 2012
Rules for Arranging Modules on cntraral rack
Rules for Arranging Modules (SIMATIC 300)
Basic Rule
Modules must be inserted in the rack without gaps.
Exception: For installations with one rack, one slot in the configuration table must remain free
(reserved for the interface module). With the S7-300, this is slot 3 and with M7-300, the slot after the
module group (slot 3, 4, 5, or 6). In the actual configuration there is no gap because the backplane bus
would be interrupted.
Slot Rules (S7-300)
Rack 0:
• Slot 1: Power supply only (for example, 6ES7 307-...) or empty
• Slot 2: CPU only (for example, 6ES7 314-...)
• Slot 3: Interface module (for example, 6ES7 360-.../361-...) or empty
• Slots 4 through 11: Signal or function modules, communications processors, or free.
Racks 1 to 3:
• Slot 1: Power supply module only (for example, 6ES7 307-...) or empty
• Slot 2: Free
• Slot 3: Interface module
• Slots 4 through 11: Signal or function modules, communications processors (dependent on the
inserted interface module), or free.
!--RELATED-POSTS-STARTS-->
Procedure for Configuring Hardware
Basic Procedure for Configuring Hardware
Window for Configuring
Configuring a programmable controller involves the use of two windows:
• The station window in which you place the racks for the station structure
• The "Hardware Catalog" window from which you select the required hardware components, for
example, racks, modules, and interface submodules
Displaying the Hardware Catalog
If the "Hardware Catalog" window is not displayed, select the menu command View > Catalog. This
command toggles the display of the Hardware Catalog on and off.
Basic Steps for Configuring a Station
First you should go to your project Click on Simatic 300 Station from tree window, see on object window
- Hardware
- CPU319-3PN/DP
During hard ware setting keep mind Rules for Arranging Modules on centraral rack !--RELATED-POSTS-STARTS-->
How to create a project in Simatic S7
After installing s7 ,you see a desktop icon on your PC of S7(Simatic Manager).
Click on the Icon and wait for opening.
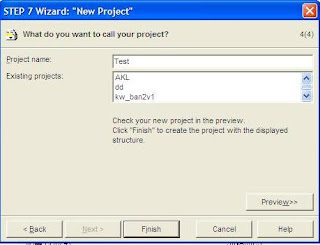
Now click on File>>New Project Wizard which appear a new pop-up window like below:

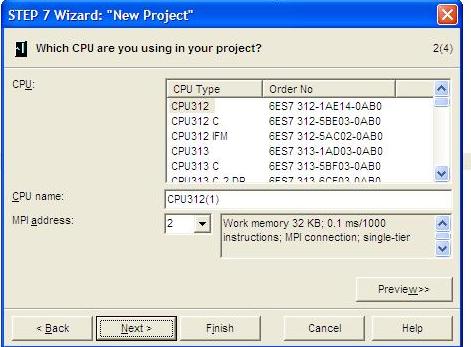
Now click on Next> button to give CPU name and MPI adress,here I select CPU319-PN/DP afterthat click Next>
 Now click to checkbox select all for Blocks,select language LAD or STL or FBD.
You can also click on create with source file chechbox. and click to next..

Now give your project name here I put a name Test and click to next button.......to create your project.

Hardware setting>>
!--RELATED-POSTS-STARTS-->
Click on the Icon and wait for opening.
Now click on File>>New Project Wizard which appear a new pop-up window like below:


You can also click on create with source file chechbox. and click to next..

Now give your project name here I put a name Test and click to next button.......to create your project.

Finally your project tree will apear like below:

Thursday, July 12, 2012
CALL_FC Call FC from Box
CALL_FC Call FC from Box
Description
CALL_FC (Call a Function from a Box) is used to call a function (FC). The call is executed if EN is "1".
If CALL_FC is executed,
• The return address of the calling block is stored,
• The previous local data area is replaced by the current local data area,
• The MA bit (active MCR bit) is shifted to the B stack,
• A new local data area for the called function is created.
After this, program processing continues in the called function.
The BR bit is scanned in order to find out the ENO. The user has to assign the required state (error
evaluation) to the BR bit in the called block using ---(SAVE).
If you call a function and the variable declaration table of the called block has IN, OUT, and IN_OUT
declarations, these variables are added in the program for the calling block as a list of formal
parameters.
When calling the function, you must assign actual parameters to the formal parameters at the call
location. Any initial values in the function declaration have no significance.

The Ladder rungs shown above are program sections from a function block written by a user. In this
FB, DB10 is opened and MCR functionality is activated. If the unconditional call of FC10 is executed,
the following occurs:
The return address of the calling FB plus selection data for DB10 and for the instance data block for
the calling FB are saved. The MA bit, set to "1" in the MCRA instruction, is pushed to the B stack and
then set to "0" for the called block (FC10). Program processing continues in FC10. If MCR functionality
is required by FC10, it must be re-activated within FC10. The state of the RLO must be saved in the
BR bit by the instruction ---(SAVE) in order to be able to evaluate errors in the calling FB. When FC10
is finished, program processing returns to the calling FB. The MA bit is restored. After execution of
FC10, program processing is continued in the calling FB depending on the ENO:
ENO = "1" FC11 is processed
ENO = "0" processing starts in the next network
If FC11 is also processed correctly, ENO = "1" and therefore Q4.0 = "1".
Another CALL instruction almost same...........
!--RELATED-POSTS-STARTS-->
Description
CALL_FC (Call a Function from a Box) is used to call a function (FC). The call is executed if EN is "1".
If CALL_FC is executed,
• The return address of the calling block is stored,
• The previous local data area is replaced by the current local data area,
• The MA bit (active MCR bit) is shifted to the B stack,
• A new local data area for the called function is created.
After this, program processing continues in the called function.
The BR bit is scanned in order to find out the ENO. The user has to assign the required state (error
evaluation) to the BR bit in the called block using ---(SAVE).
If you call a function and the variable declaration table of the called block has IN, OUT, and IN_OUT
declarations, these variables are added in the program for the calling block as a list of formal
parameters.
When calling the function, you must assign actual parameters to the formal parameters at the call
location. Any initial values in the function declaration have no significance.
The Ladder rungs shown above are program sections from a function block written by a user. In this
FB, DB10 is opened and MCR functionality is activated. If the unconditional call of FC10 is executed,
the following occurs:
The return address of the calling FB plus selection data for DB10 and for the instance data block for
the calling FB are saved. The MA bit, set to "1" in the MCRA instruction, is pushed to the B stack and
then set to "0" for the called block (FC10). Program processing continues in FC10. If MCR functionality
is required by FC10, it must be re-activated within FC10. The state of the RLO must be saved in the
BR bit by the instruction ---(SAVE) in order to be able to evaluate errors in the calling FB. When FC10
is finished, program processing returns to the calling FB. The MA bit is restored. After execution of
FC10, program processing is continued in the calling FB depending on the ENO:
ENO = "1" FC11 is processed
ENO = "0" processing starts in the next network
If FC11 is also processed correctly, ENO = "1" and therefore Q4.0 = "1".
Another CALL instruction almost same...........
!--RELATED-POSTS-STARTS-->
Call FC SFC from Coil (without Parameters)
---(Call) Call FC SFC from Coil (without Parameters)
Symbol
<FC/SFC no.>
---( CALL )
Parameter Data Type Memory Area Description
<FC/SFC no.> BLOCK_FC - Number of FC/SFC; range depends on CPU
BLOCK_SFC
Description
---(Call) (Call FC or SFC without Parameters) is used to call a function (FC) or system function (SFC)
that has no passed parameters. A call is only executed if RLO is "1" at the CALL coil. If ---(Call) is
executed,
• The return address of the calling block is stored,
• The previous local data area is replaced by the current local data area,
• The MA bit (active MCR bit) is shifted to the B stack,
• A new local data area for the called function is created.
After this, program processing continues in the called FC or SFC.

The Ladder rungs shown above are program sections from a function block written by a user. In this
FB, DB10 is opened and MCR functionality is activated. If the unconditional call of FC10 is executed,
the following occurs:
The return address of the calling FB plus selection data for DB10 and for the instance data block for
the calling FB are saved. The MA bit, set to "1" in the MCRA instruction, is pushed to the B stack and
then set to "0" for the called block (FC10). Program processing continues in FC10. If MCR functionality
is required by FC10, it must be re-activated within FC10. When FC10 is finished, program processing
returns to the calling FB. The MA bit is restored, DB10 and the instance data block for the user-written
FB become the current DBs again, regardless of which DBs FC10 has used. The program continues
with the next rung by assigning the logic state of I0.0 to output Q4.0. The call of FC11 is a conditional
call. It is only executed if I0.1 is "1". If it is executed, the process of passing program control to and
returning from FC11 is the same as was described for FC10.
!--RELATED-POSTS-STARTS-->
Overview of Program Control Instructions
Overview of Program Control Instructions
Description
The following program control instructions are available:
• ---(CALL) Call FC SFC from Coil (without Parameters)
• CALL_FB Call FB from Box
• CALL_FC Call FC from Box
• CALL_SFB Call System FB from Box
• CALL_SFC Call System FC from Box
• Call Multiple Instance
• Call Block from a Library
• Important Notes on Using MCR Functions
• ---(MCR<) Master Control Relay On
• ---(MCR>) Master Control Relay Off
• ---(MCRA) Master Control Relay Activate
• ---(MCRD) Master Control Relay Deactivate
• RET Return !--RELATED-POSTS-STARTS-->
Jump-If-Not
---( JMPN ) Jump-If-Not
Symbol
<label name>
---( JMPN )
Description
---( JMPN ) (Jump-If-not) corresponds to a "goto label" function which is executed if the RLO is "0".
A destination (LABEL) must also exist for every ---( JMPN ).
All instructions between the jump instruction and the label are not executed.
If a conditional jump is not executed, the RLO changes to "1" after the jump instruction.

Q4.0 is not executed even if there is a logic "1" at I0.3.
!--RELATED-POSTS-STARTS-->
Conditional Jump
--(JMP)--- Conditional Jump
Symbol
<label name>
---( JMP )
Description
---( JMP ) (jump within the block when 1) functions as a conditional jump when the RLO of the
previous logic operation is "1".
A destination (LABEL) must also exist for every ---( JMP ).
All instructions between the jump instruction and the label are not executed.
If a conditional jump is not executed, the RLO changes to "1" after the jump instruction.

If I0.0 = "1", the jump to label CAS1 is executed. Because of the jump, the instruction to reset output
Q4.0 is not executed even if there is a logic "1" at I0.3.
!--RELATED-POSTS-STARTS-->
Unconditional Jump
---(JMP)--- Unconditional Jump
Symbol
<label name>
---( JMP )
Description
---( JMP ) (jump within the block when 1) functions as an absolute jump when there is no other Ladder
element between the left-hand power rail and the instruction (see in example before JMP there is no logic).
A destination (LABEL) must also exist for every ---( JMP ).
All instructions between the jump instruction and the label are not executed.

The jump is always executed and the instructions between the jump instruction and the jump label are
missed out
!--RELATED-POSTS-STARTS-->
Tuesday, July 10, 2012
Encoder

An encoder is a device, circuit, transducer, software program, algorithm or person that converts information from one format or code to another, for the purposes of standardization, speed, secrecy, security, or saving space by shrinking size.
What is the basic definition of an encoder?
Answer: An encoder comes in two architectures. The first architecture is linear. The second architecture is rotary. Both types sense mechanical motion and translates the information (velocity, position, acceleration) into useful electrical data.
What isIncremental encoder?
An incremental encoder is a pulse generator that provides square–wave signals and a zero index.
The disc has 2 channels divided into “n” equal angular intervals; alternately opaque and clear. “n” is called resolution or number of counts.
Pulses counted by the processing electronics give the angular position of the rotor. For this purpose 2 squarewaves A and B are used with a third channel, Z, synchronous with signals A and B giving only one signal per revolution. It allows the user to initialize or reset the count.
 |  | |
 | ||
 |  | |
| Incremental encoder chart | ||
This concept has been developed to compensate for the performance limitations of incremental encoders :
- need for initialization
- must be re–zeroed after a power interruption: zero reset to obtain the mechanism angular position
- sensitivity to the interference
The output code is unique for each position. The resolution is equal to 2n(n= number of bit).
The shaft position information is given instantly when power is supplied.
There are two different types of absolute optical encoders :
- Single turn absolute optical encoder –> gives the absolute angular position over 360° rotation.
- Multiturn absolute encoder –> a system of additional shafts and discs which allows the number of revolutions to be counted.
| | |
 | ||
| | |
| Multiturn Absolute Encoder Principle | ||
Answer: A channel is an electrical output signal from an encoder. Typical incremental encoders have either two or three channels. An example would be: A, A not, B, B not, and Z, Z not (also referred to I or I not.).
What is the Index pulse (strobe, Z, and I.)?
Answer: It is the absolute reference added to an incremental encoder. It is also known as home position. It signifies a full rotation of the encoder disk
How can I reduce the effect of noise when using encoders?
Answer: There are several ways to improve noise immunity. Be careful to separate motor and all power wires away from encoder wires. Always separate the channels from each other. All encoder wire should be shielded and carefully terminated. The pigtail that connects to the control unit using the encoder should be as short as possible. The leads will act as antennas for any stray RF in the vicinity. The addition of other noise suppression devices may be required in high noise environments.
What equipment do I need to troubleshoot an encoder?
Answer: A: An oscilloscope or specially designed encoder tester. A basic multimeter will do for basic diagnostics such as power supply and low speed pulse outputs. Any advanced pulse detection and diagnostics needs to be performed by a trained technician and an oscilloscope.
!--RELATED-POSTS-STARTS-->
Thursday, July 5, 2012
S7 system function
System Function Blocks
| Number | Name | Family | Description |
| SFB 0 | CTU | IEC_TC | Count Up |
| SFB 1 | CTD | IEC_TC | Count Down |
| SFB 2 | CTUD | IEC_TC | Count Up/Down |
| SFB 3 | TP | IEC_TC | Generate a Pulse |
| SFB 4 | TON | IEC_TC | Generate an On Delay |
| SFB 5 | TOF | IEC_TC | Generate an Off Delay |
| SFB 8 | USEND | COM_FUNC | Uncoordinated Sending of Data |
| SFB 9 | URCV | COM_FUNC | Uncoordinated Receiving of Data |
| SFB 12 | BSEND | COM_FUNC | Sending Segmented Data |
| SFB 13 | BRCV | COM_FUNC | Receiving Segmented Data |
| SFB 14 | GET | COM_FUNC | Read Data from a Remote CPU |
| SFB 15 | PUT | COM_FUNC | Write Data to a Remote CPU |
| SFB 16 | COM_FUNC | Send Data to Printer | |
| SFB 19 | START | COM_FUNC | Initiate a Warm or Cold Restart on a Remote Device |
| SFB 20 | STOP | COM_FUNC | Changing a Remote Device to the STOP State |
| SFB 21 | RESUME | COM_FUNC | Initiate a Hot Restart on a Remote Device |
| SFB 22 | STATUS | COM_FUNC | Query the Status of a Remote Partner |
| SFB 23 | USTATUS | COM_FUNC | Receive the Status of a Remote Device |
| SFB 29 | HS_COUNT | COUNTERS | Counter (high-speed counter, integrated function) (only exist on the CPU 312 IFM and CPU 314 IFM) |
| SFB 30 | FREQ_MES | COUNTERS | Frequency Meter (frequency meter, integrated function (only exist on the CPU 312 IFM and CPU 314 IFM) |
| SFB 31 | NOTIFY_8P | COM_FUNC | Generating block related messages without acknowledgement indication |
| SFB 32 | DRUM | TIMERS | Implement a Sequencer |
| SFB 33 | ALARM | COM_FUNC | Generate Block-Related Messages with Acknowledgment Display |
| SFB 34 | ALARM_8 | COM_FUNC | Generate Block-Related Messages without Values for 8 Signals |
| SFB 35 | ALARM_8P | COM_FUNC | Generate Block-Related Messages with Values for 8 Signals |
| SFB 36 | NOTIFY | COM_FUNC | Generate Block-Related Messages without Acknowledgment Display |
| SFB 37 | AR_SEND | COM_FUNC | Send Archive Data |
| SFB 38 | HSC_A_B | COUNTERS | Counter A/B (integrated function) (only exist on the CPU 314 IFM) |
| SFB 39 | POS | ICONT | Position (integrated function) (only exist on the CPU 314 IFM) |
| SFB 41 | CONT_C | ICONT | Continuous Control (only exist on the CPU 314 IFM) |
| SFB 42 | CONT_S | ICONT | Step Control (only exist on the CPU 314 IFM) |
| SFB 43 | PULSEGEN | ICONT | Pulse Generation (only exist on the CPU 314 IFM) |
| SFB 44 | ANALOG | TEC_FUNC | Positioning with Analog Output (only exist on the S7-300C CPUs) |
| SFB 46 | DIGITAL | TEC_FUNC | Positioning with Digital Output (only exist on the S7-300C CPUs) |
| SFB 47 | COUNT | TEC_FUNC | Controlling the Counter (only exist on the S7-300C CPUs) |
| SFB 48 | FREQUENC | TEC_FUNC | Controlling the Frequency Measurement (only exist on the S7-300C CPUs) |
| SFB 49 | PULSE | TEC_FUNC | Controlling Pulse Width Modulation (only exist on the S7-300C CPUs) |
| SFB 52 | RDREC | DP | Reading a Data Record |
| SFB 53 | WRREC | DP | Writing a Data Record |
| SFB 54 | RALRM | DP | Receiving an Interrupt |
| SFB 60 | SEND_PTP | TEC_FUNC | Sending Data (ASCII, 3964(R)) (only exist on the S7-300C CPUs) |
| SFB 61 | RECV_PTP | TEC_FUNC | Receiving Data (ASCII, 3964(R)) (only exist on the S7-300C CPUs) |
| SFB 62 | RES_RECV | TEC_FUNC | Deleting the Receive Buffer (ASCII, 3964(R)) (only exist on the S7-300C CPUs) |
| SFB 63 | SEND_RK | TEC_FUNC | Sending Data (RK 512) (only exist on the S7-300C CPUs) |
| SFB 64 | FETCH_RK | TEC_FUNC | Fetching Data (RK 512) (only exist on the S7-300C CPUs) |
| SFB 65 | SERVE_RK | TEC_FUNC | Receiving and Providing Data (RK 512) (only exist on the S7-300C CPUs) |
| SFB 75 | SALRM | DP | Send interrupt to DP master |
| SFB 81 | RD_DPAR | IO_FUNCT | Read Predefined Parameter |
System Function Calls
| Number | Name | Family | Description |
| SFC 0 | SET_CLK | CLK_FUNC | Set System Clock |
| SFC 1 | READ_CLK | CLK_FUNC | Read System Clock |
| SFC 2 | SET_RTM | CLK_FUNC | Set Run-time Meter |
| SFC 3 | CTRL_RTM | CLK_FUNC | Start/Stop Run-time Meter |
| SFC 4 | READ_RTM | CLK_FUNC | Read Run-time Meter |
| SFC 5 | GADR_LGC | IO_FUNCT | Query Logical Address of a Channel |
| SFC 6 | RD_SINFO | DB_FUNCT | Read OB Start Information |
| SFC 7 | DP_PRAL | DP | Trigger a Hardware Interrupt on the DP Master |
| SFC 9 | EN_MSG | COM_FUNC | Enable Block-Related, Symbol-Related and Group Status Messages |
| SFC 10 | DIS_MSG | COM_FUNC | Disable Block-Related, Symbol-Related and Group Status Messages |
| SFC 11 | DPSYC_FR | DP | Synchronize Groups of DP Slaves |
| SFC 12 | D_ACT_DP | DP | Deactivation and activation of DP slaves |
| SFC 13 | DPNRM_DG | DIAGNSTC | Read Diagnostic Data of a DP Slave (Slave Diagnostics) |
| SFC 14 | DPRD_DAT | DP | Read Consistent Data of a Standard DP Slave |
| SFC 15 | DPWR_DAT | DP | Write Consistent Data to a DP Standard Slave |
| SFC 17 | ALARM_SQ | PMC_FUNC | Generate Acknowledgeable Block-Related Messages |
| SFC 18 | ALARM_S | PMC_FUNC | Generate Permanently Acknowledged Block-Related Messages |
| SFC 19 | ALARM_SC | PMC_FUNC | Query the Acknowledgment Status of the last ALARM_SQ Entering State Message |
| SFC 20 | BLKMOV | MOVE | Copy Variables |
| SFC 21 | FILL | MOVE | Initialize a Memory Area |
| SFC 22 | CREAT_DB | DB_FUNCT | Create Data Block |
| SFC 23 | DEL_DB | DB_FUNCT | Delete Data Block |
| SFC 24 | TEST_DB | DB_FUNCT | Test Data Block |
| SFC 25 | COMPRESS | DB_FUNCT | Compress the User Memory |
| SFC 26 | UPDAT_PI | IO_FUNCT | Update the Process Image Update Table |
| SFC 27 | UPDAT_PO | IO_FUNCT | Update the Process Image Output Table |
| SFC 28 | SET_TINT | PGM_CNTL | Set Time-of-Day Interrupt |
| SFC 29 | CAN_TINT | PGM_CNTL | Cancel Time-of-Day Interrupt |
| SFC 30 | ACT_TINT | PGM_CNTL | Activate Time-of-Day Interrupt |
| SFC 31 | QRY_TINT | PGM_CNTL | Query Time-of-Day Interrupt |
| SFC 32 | SRT_DINT | PGM_CNTL | Start Time-Delay Interrupt |
| SFC 33 | CAN_DINT | PGM_CNTL | Cancel Time-Delay Interrupt |
| SFC 34 | QRY_DINT | PGM_CNTL | Query Time-Delay Interrupt |
| SFC 35 | MP_ALM | PGM_CNTL | Trigger Multicomputing Interrupt |
| SFC 36 | MSK_FLT | DIAGNSTC | Mask Synchronous Errors |
| SFC 37 | DMSK_FLT | DIAGNSTC | Unmask Synchronous Errors |
| SFC 38 | READ_ERR | DIAGNSTC | Read Error Register |
| SFC 39 | DIS_IRT | IRT_FUNC | Disable New Interrupts and Asynchronous Errors |
| SFC 40 | EN_IRT | IRT_FUNC | Enable New Interrupts and Asynchronous Errors |
| SFC 41 | DIS_AIRT | IRT_FUNC | Delay Higher Priority Interrupts and Asynchronous Errors |
| SFC 42 | EN_AIRT | IRT_FUNC | Enable Higher Priority Interrupts and Asynchronous Errors |
| SFC 43 | RE_TRIGR | PGM_CNTL | Re-trigger Cycle Time Monitoring |
| SFC 44 | REPL_VAL | DIAGNSTC | Transfer Substitute Value to Accumulator 1 |
| SFC 46 | STP | PGM_CNTL | Change the CPU to STOP |
| SFC 47 | WAIT | PGM_CNTL | Delay Execution of the User Program |
| SFC 48 | SNC_RTCB | CLK_FUNC | Synchronize Slave Clocks |
| SFC 49 | LGC_GADR | IO_FUNCT | Query the Module Slot Belonging to a Logical Address |
| SFC 50 | RD_LGADR | IO_FUNCT | Query all Logical Addresses of a Module |
| SFC 51 | RDSYSST | DIAGNSTC | Read a System Status List or Partial List |
| SFC 52 | WR_USMSG | DIAGNSTC | Write a User-Defined Diagnostic Event to the Diagnostic Buffer |
| SFC 54 | RD_PARM | IO_FUNCT | Read Defined Parameters |
| SFC 55 | WR_PARM | IO_FUNCT | Write Dynamic Parameters |
| SFC 56 | WR_DPARM | IO_FUNCT | Write Default Parameters |
| SFC 57 | PARM_MOD | IO_FUNCT | Assign Parameters to a Module |
| SFC 58 | WR_REC | IO_FUNCT | Write a Data Record |
| SFC 59 | RD_REC | IO_FUNCT | Read a Data Record |
| SFC 60 | GD_SND | COM_FUNC | Send a GD Packet |
| SFC 61 | GD_RCV | COM_FUNC | Fetch a Received GD Packet |
| SFC 62 | CONTROL | COM_FUNC | Query the Status of a Connection Belonging to a Communication SFB Instance |
| SFC 63 | AB_CALL | PLASTICS | Assembly Code Block (only exists for CPU 614) |
| SFC 64 | TIME_TCK | CLK_FUNC | Read the System Time |
| SFC 65 | X_SEND | COM_FUNC | Send Data to a Communication Partner outside the Local S7 Station |
| SFC 66 | X_RCV | COM_FUNC | Receive Data from a Communication Partner outside the Local S7 Station |
| SFC 67 | X_GET | COM_FUNC | Read Data from a Communication Partner outside the Local S7 Station |
| SFC 68 | X_PUT | COM_FUNC | Write Data to a Communication Partner outside the Local S7 Station |
| SFC 69 | X_ABORT | COM_FUNC | Abort an Existing Connection to a Communication Partner outside the Local S7 Station |
| SFC 70 | GEO_LOG | IO_FUNCT | Determine Start Address of a Module |
| SFC 71 | LOG_GEO | IO_FUNCT | Determine the Slot Belonging to a Logical Address |
| SFC 72 | I_GET | COM_FUNC | Read Data from a Communication Partner within the Local S7 Station |
| SFC 73 | I_PUT | COM_FUNC | Write Data to a Communication Partner within the Local S7 Station |
| SFC 74 | I_ABORT | COM_FUNC | Abort an Existing Connection to a Communication Partner within the Local S7 Station |
| SFC 78 | OB_RT | DIAGNSTC | Determine OB program runtime |
| SFC 79 | SET | BIT_LOGC | Set a Range of Outputs |
| SFC 80 | RSET | BIT_LOGC | Reset a Range of Outputs |
| SFC 81 | UBLKMOV | MOVE | Uninterruptible Block Move |
| SFC 82 | CREA_DBL | DB_CTRL | Create a Data Block in the Load Memory |
| SFC 83 | READ_DBL | DB_CTRL | Read from a Data Block in Load Memory |
| SFC 84 | WRIT_DBL | DB_CTRL | Write from a Data Block in Load Memory |
| SFC 85 | CREA_DB | DB_FUNCT | Create a Data Block |
| SFC 87 | C_DIAG | COM_FUNC | Diagnosis of the Actual Connection Status |
| SFC 90 | H_CTRL | HF_FUNCT | Control Operation in H Systems |
| SFC 100 | SET_CLKS | CLK_FUNC | Setting the Time-of-Day and the TOD Status |
| SFC 101 | RTM | CLK_FUNC | Handling runtime meters |
| SFC 102 | RD_DPARA | IO_FUNCT | Redefined Parameters |
| SFC 103 | DP_TOPOL | DP | Identifying the bus topology in a DP master system |
| SFC 104 | CIR | PGM_CNTL | Controlling CiR |
| SFC 105 | READ_SI | PMC_FUNC | Reading Dynamic System Resources |
| SFC 106 | DEL_SI | PMC_FUNC | Deleting Dynamic System Resources |
| SFC 107 | ALARM_DQ | PMC_FUNC | Generating Always Acknowledgeable and Block-Related Messages |
| SFC 108 | ALARM_D | PMC_FUNC | Generating Always Acknowledgeable and Block-Related Messages |
| SFC 112 | PN_IN | PROFIne2 | Update inputs in the user program interface of PROFInet components |
| SFC 113 | PN_OUT | PROFIne2 | Update outputs in the user program interface of PROFInet components |
| SFC 114 | PN_DP | PROFIne2 | Update DP interconnections |
| SFC 126 | SYNC_PI | IO_FUNCT | Update process image partition input table in synchronous cycle |
| SFC 127 | SYNC_PO | IO_FUNCT | Update process image partition output table in synchronou |
 !--RELATED-POSTS-STARTS-->
Seimens technical term
siemens technical term
!--RELATED-POSTS-STARTS-->
| Term | Description | Explanation |
| C7 | Combo PLC/HMI system | A PLC and screen in one package |
| CFC | Continuous Function Chart | Optional programming language |
| CP | Communication Processor | Modules used for special communication protocols |
| DB | Data Block | Memory storage areas for user data |
| FB | Function Block | A function with it's own data block |
| FBD | Function Block Diagram | Standard programming language |
| FC | Function Call | Called progammed blocks |
| FM | Function Module | Modules with special functions (e.g. positioning) |
| GSD | Generic Station Description | Files used for Profibus descriptions |
| HiGraph | Optional programming language | |
| IM | Interface Module | Modules to connect remote racks |
| LAD | Ladder Logic Diagram | Standard programming language |
| M7 | Programmable modules | A module with processing capabilities |
| MMC | Micro Memory Card | Compact plug-in memory card |
| MPI | Multi Point Interface | Standard communication protocol |
| OB | Organization Block | Blocks for user programs based on different operating system events. |
| OP | Operator Panel | Simple display with or without buttons |
| PCS | Process Control System | Software for the entire process chain |
| PG | Programming Terminal | Dedicated Siemens device - basically a PC |
| PPI | Point to Point Interface | Serial RS-232 communication |
| Profibus DP | Profibus Decentral Peripherals | Networking protocol used for factory automation |
| Profibus PA | Profibus Process Automation | Networking protocol used for process automation |
| S7 | SIMATIC Step 7 product line | |
| SCL | Structured Control Language | Optional programming language |
| SFB | System Function Block | Integrated FB for CPU information |
| SFC | System Function Call | Integrated FC for CPU information |
| SM | Signal Module | Standard Input/Output modules |
| STL | Statement List | Text based programming language |
| TP | Touch Panel | Touch screen display |
| UDT | User-Definded Data Type | Special data structures defined by the user |
| VAT | Variable Access Table | Tables used to monitor/modify values in the PLC |
Data Block Instructions
Data Block Instructions
---(OPN) Open Data Block: DB or DI
Symbol
<DB no.> or <DI no.>
---(OPN)
Parameter Data Type Memory Area Description
<DB no.>
<DI no.> BLOCK_DB DB, DI Number of DB/DI; range depends on CPU
Description
---(OPN) (Open a Data Block) opens a shared data block (DB) or an instance data block (DI). The
---(OPN) function is an unconditional call of a data block. The number of the data block is transferred
into the DB or DI register. The subsequent DB and DI commands access the corresponding blocks,
depending on the register contents.

Data block 10 (DB10) is opened. The contact address (DBX0.0) refers to bit zero of data byte zero of
the current data record contained in DB10. The signal state of this bit is assigned to the output Q4.0. !--RELATED-POSTS-STARTS-->
Wednesday, July 4, 2012
CMP ? D Compare Double Integer
CMP ? D Compare Double Integer

Parameter Data Type Memory Area Description
box input BOOL I, Q, M, L, D Result of the previous logic operation
box output BOOL I, Q, M, L, D Result of the comparison, is only processed
further if the RLO at the box input = 1
IN1 INT I, Q, M, L, D First value to compare
or constant
IN2 INT I, Q, M, L, D Second value to compare
or constant
Description
CMP ? D (Compare Double Integer) can be used like a normal contact. It can be located at any
position where a normal contact could be placed. IN1 and IN2 are compared according to the type of
comparison you choose.
If the comparison is true, the RLO of the function is "1". It is linked to the RLO of a rung network by
AND if the compare element is used in series, or by OR if the box is used in parallel.

Output Q4.0 is set if the following conditions exist:
• There is a signal state of "1" at inputs I0.0 and at I0.1
• And MD0 >= MD4
• And there is a signal state of"1" at input I0.2
!--RELATED-POSTS-STARTS-->

Parameter Data Type Memory Area Description
box input BOOL I, Q, M, L, D Result of the previous logic operation
box output BOOL I, Q, M, L, D Result of the comparison, is only processed
further if the RLO at the box input = 1
IN1 INT I, Q, M, L, D First value to compare
or constant
IN2 INT I, Q, M, L, D Second value to compare
or constant
Description
CMP ? D (Compare Double Integer) can be used like a normal contact. It can be located at any
position where a normal contact could be placed. IN1 and IN2 are compared according to the type of
comparison you choose.
If the comparison is true, the RLO of the function is "1". It is linked to the RLO of a rung network by
AND if the compare element is used in series, or by OR if the box is used in parallel.
Output Q4.0 is set if the following conditions exist:
• There is a signal state of "1" at inputs I0.0 and at I0.1
• And MD0 >= MD4
• And there is a signal state of"1" at input I0.2
!--RELATED-POSTS-STARTS-->
CMP ? I Compare Integer
CMP ? I Compare Integer

Parameter Data Type Memory Area Description
box input BOOL I, Q, M, L, D Result of the previous logic operation
box output BOOL I, Q, M, L, D Result of the comparison, is only processed
further if the RLO at the box input = 1
IN1 INT I, Q, M, L, D First value to compare
or constant
IN2 INT I, Q, M, L, D Second value to compare
or constant
Description
CMP ? I (Compare Integer) can be used like a normal contact. It can be located at any position where
a normal contact could be placed. IN1 and IN2 are compared according to the type of comparison you
choose.
If the comparison is true, the RLO of the function is "1". It is linked to the RLO of the whole rung by
AND if the box is used in series, or by OR if the box is used in parallel.

Output Q4.0 is set if the following conditions exist:
• There is a signal state of "1" at inputs I0.0 and at I0.1
• AND MW0 >= MW2
!--RELATED-POSTS-STARTS-->
Comparison Instructions
Overview of Comparison Instructions
Description
IN1 and IN2 are compared according to the type of comparison you choose:
== IN1 is equal to IN2
<> IN1 is not equal to IN2
> IN1 is greater than IN2
< IN1 is less than IN2
>= IN1 is greater than or equal to IN2
<= IN1 is less than or equal to IN2
If the comparison is true, the RLO of the function is "1". It is linked to the RLO of a rung network by
AND if the compare element is used in series, or by OR if the box is used in parallel.
The following comparison instructions are available:
• CMP ? I Compare Integer
• CMP ? D Compare Double Integer
• CMP ? R Compare Real !--RELATED-POSTS-STARTS-->
Tuesday, July 3, 2012
After installed S7 v5.5 you should give crack for working in S7 you can get crack from web site.
Now open Simatic Manager from desktop or Click Start>>All program>>SIMATIC>>Simatic Manager
after open Simatic Manager Click on File then New project Wizard Its appear like that


Now select your CPU type I choose here CPU319 3PN-DP then click next

Click on checkbox for all block,language type LAD
after that Click on Check box of create with source files
Then click next !--RELATED-POSTS-STARTS-->
Now open Simatic Manager from desktop or Click Start>>All program>>SIMATIC>>Simatic Manager
after open Simatic Manager Click on File then New project Wizard Its appear like that

Then click on "Next" Which appear like that

after that Click on Check box of create with source files
Then click next !--RELATED-POSTS-STARTS-->
Monday, July 2, 2012
SR Set-Reset Flip Flop
SR Set-Reset Flip Flop

Parameter Data Type Memory Area Description
<address> BOOL I, Q, M, L, D Set or reset bit
S BOOL I, Q, M, L, D Enable set instruction
R BOOL I, Q, M, L, D Enable reset instruction
Q BOOL I, Q, M, L, D Signal state of <address>
Description
SR (Set-Reset Flip Flop) is set if the signal state is "1" at the S input, and "0" at the R input. Otherwise,
if the signal state is "0" at the S input and "1" at the R input, the flip flop is reset. If the RLO is "1" at
both inputs, the order is of primary importance. The SR flip flop executes first the set instruction then
the reset instruction at the specified <address>, so that this address remains reset for the remainder
of program scanning.
The S (Set) and R (Reset) instructions are executed only when the RLO is "1". RLO "0" has no effect
on these instructions and the address specified in the instruction remains unchanged.
MCR (Master Control Relay) dependency
MCR dependency is activated only if a SR flip flop is placed inside an active MCR zone. Within an
activated MCR zone, if the MCR is on; the addressed bit is set to "1" or reset to "0" as described
above. If the MCR is off, the current state of the specified address remains unchanged regardless of
input states.

If the signal state is "1" at input I0.0 and "0" at I0.1, memory bit M0.0 is set and output Q4.0 is "1".
Otherwise, if the signal state at input I0.0 is "0" and at I0.1 is "1", memory bit M0.0 is reset and output
Q4.0 is "0". If both signal states are "0", nothing is changed. If both signal states are "1", the reset
instruction dominates because of the order; M0.0 is reset and Q4.0 is "0".
If the example is within an activated MCR zone:
When MCR is on, Q4.0 is set or reset as described above.
When MCR is off, Q4.0 is left unchanged regardless of input states.
!--RELATED-POSTS-STARTS-->
---(SAVE) Save RLO into BR Memory
---(SAVE) Save RLO into BR Memory
Symbol
---( SAVE )
Description
---(SAVE) (Save RLO into BR Memory) saves the RLO to the BR bit of the status word. The first check
bit /FC is not reset. For this reason, the status of the BR bit is included in the AND logic operation in
the next network.
For the instruction "SAVE" (LAD, FBD, STL), the following applies and not the recommended use
specified in the manual and online help:
We do not recommend that you use SAVE and then check the BR bit in the same block or in
subordinate blocks, because the BR bit can be modified by many instructions occurring inbetween. It
is advisable to use the SAVE instruction before exiting a block, since the ENO output (= BR bit) is then
set to the value of the RLO bit and you can then check for errors in the block.

!--RELATED-POSTS-STARTS-->
---( P )--- Positive RLO Edge Detection
---( P )--- Positive RLO Edge Detection
Symbol
<address>
---( P )---
Parameter Data Type Memory Area Description
<address> BOOL I, Q, M, L, D Edge memory bit, storing the previous signal state of RLO
Description
---( P )--- (Positive RLO Edge Detection) detects a signal change in the address from "0" to "1" and
displays it as RLO = "1" after the instruction. The current signal state in the RLO is compared with the
signal state of the address, the edge memory bit. If the signal state of the address is "0" and the RLO
was "1" before the instruction, the RLO will be "1" (pulse) after this instruction, and "0" in all other
cases. The RLO prior to the instruction is stored in the address.

The edge memory bit M0.0 saves the old RLO state. When there is a signal change at the RLO from
"0" to "1", the program jumps to label CAS1.
!--RELATED-POSTS-STARTS-->
---( N )--- Negative RLO Edge Detection
---( N )--- Negative RLO Edge Detection
Symbol
<address>
---( N )
Parameter Data Type Memory Area Description
<address> BOOL I, Q, M, L, D Edge memory bit, storing the previous signal state of RLO
Description
---( N )--- (Negative RLO Edge Detection) detects a signal change in the address from "1" to "0" and
displays it as RLO = "1" after the instruction. The current signal state in the RLO is compared with the
signal state of the address, the edge memory bit. If the signal state of the address is "1" and the RLO
was "0" before the instruction, the RLO will be "1" (pulse) after this instruction, and "0" in all other
cases. The RLO prior to the instruction is stored in the address.

The edge memory bit M0.0 saves the old RLO state. When there is a signal change at the RLO from
"1" to "0", the program jumps to label CAS1.
!--RELATED-POSTS-STARTS-->
RS Reset-Set Flip Flop
RS Reset-Set Flip Flop

Parameter Data Type Memory Area Description
<address> BOOL I, Q, M, L, D Set or reset bit
S BOOL I, Q, M, L, D Enabled reset instruction
R BOOL I, Q, M, L, D Enabled reset instruction
Q BOOL I, Q, M, L, D Signal state of<address>
Description
RS (Reset-Set Flip Flop) is reset if the signal state is "1" at the R input, and "0" at the S input.
Otherwise, if the signal state is "0" at the R input and "1" at the S input, the flip flop is set. If the RLO is
"1" at both inputs, the order is of primary importance. The RS flip flop executes first the reset
instruction then the set instruction at the specified <address>, so that this address remains set for the
remainder of program scanning.
The S (Set) and R (Reset) instructions are executed only when the RLO is "1". RLO "0" has no effect
on these instructions and the address specified in the instruction remains unchanged.
MCR (Master Control Relay) dependency
MCR dependency is activated only if a RS flip flop is placed inside an active MCR zone. Within an
activated MCR zone, if the MCR is on, the addressed bit is reset to "0" or set to "1" as described
above. If the MCR is off, the current state of the specified address remains unchanged regardless of
input states.

If the signal state is "1" at input I0.0 and "0" at I0.1, memory bit M0.0 is set and output Q4.0 is "0".
Otherwise, if the signal state at input I0.0 is "0" and at I0.1 is "1", memory bit M0.0 is reset and output
Q4.0 is "1". If both signal states are "0", nothing is changed. If both signal states are "1", the set
instruction dominates because of the order; M0.0 is set and Q4.0 is "1".
If the example is within an activated MCR zone:
When MCR is on, Q4.0 is reset or set as described above.
When MCR is off, Q4.0 is left unchanged regardless of input states
!--RELATED-POSTS-STARTS-->
---( S ) Set Coil
---( S ) Set Coil
Symbol
<address>
---( S )
Parameter Data Type Memory Area Description
<address> BOOL I, Q, M, L, D Set bit
Description
---( S ) (Set Coil) is executed only if the RLO of the preceding instructions is "1" (power flows to the
coil). If the RLO is "1" the specified <address> of the element is set to "1".
An RLO = 0 has no effect and the current state of the element's specified address remains
unchanged.
MCR (Master Control Relay) dependency
MCR dependency is activated only if a set coil is placed inside an active MCR zone. Within an
activated MCR zone, if the MCR is on and there is power flow to a set coil; the addressed bit is set to
the "1" state. If the MCR is off, the current state of the element's specified address remains unchanged
regardless of power flow status.

The signal state of output Q4.0 is "1" if one of the following conditions exists:
The signal state is "1" at inputs I0.0 and I0.1
Or the signal state is "0" at input I0.2.
If the RLO is "0", the signal state of output Q4.0 remains unchanged.
If the example rungs are within an activated MCR zone:
When MCR is on, Q4.0 is set as described above.
When MCR is off, Q4.0 is left unchanged regardless of RLO state (power flow status).
!--RELATED-POSTS-STARTS-->
---( R ) Reset Coil
---( R ) Reset Coil
Symbol
<address>
---( R )
Parameter Data Type Memory Area Description
<address> BOOL I, Q, M, L, D, T, C Reset bit
Description
---( R ) (Reset Coil) is executed only if the RLO of the preceding instructions is "1" (power flows to the
coil). If power flows to the coil (RLO is "1"), the specified <address> of the element is reset to "0". A
RLO of "0" (no power flow to the coil) has no effect and the state of the element's specified address
remains unchanged. The <address> may also be a timer (T no.) whose timer value is reset to "0" or a
counter (C no.) whose counter value is reset to "0".
MCR (Master Control Relay) dependency
MCR dependency is activated only if a reset coil is placed inside an active MCR zone. Within an
activated MCR zone, if the MCR is on and there is power flow to a reset coil; the addressed bit is reset
to the "0" state. If the MCR is off, the current state of the element's specified address remains
unchanged regardless of power flow status.

The signal state of output Q4.0 is reset to "0" if one of the following conditions exists:
The signal state is "1" at inputs I0.0 and I0.1
Or the signal state is "0" at input I0.2.
If the RLO is "0", the signal state of output Q4.0 remains unchanged.
The signal state of timer T1 is only reset if:
the signal state is "1" at input I0.3.
The signal state of counter C1 is only reset if:
the signal state is "1" at input I0.4.
If the example rungs are within an activated MCR zone:
When MCR is on, Q4.0, T1, and C1 are reset as described above.
When MCR is off, Q4.0, T1, and C1 are left unchanged regardless of RLO state (power flow status).
!--RELATED-POSTS-STARTS-->
---( # )--- Midline Output
---( # )--- Midline Output
Symbol
<address>
---( # )---
Parameter Data Type Memory Area Description
<address> BOOL I, Q, M, *L, D Assigned bit
* An L area address can only be used if it is declared TEMP in the variable declaration table of a logic
block (FC, FB, OB).
Description
---( # )--- (Midline Output) is an intermediate assigning element which saves the RLO bit (power flow
status) to a specified <address>. The midline output element saves the logical result of the preceding
branch elements. In series with other contacts, ---( # )--- is inserted like a contact. A ---( # )--- element
may never be connected to the power rail or directly after a branch connection or at the end of a
branch. A negated ---( # )--- can be created by using the ---|NOT|--- (invert power flow) element.
MCR (Master Control Relay) dependency
MCR dependency is activated only if a midline output coil is placed inside an active MCR zone. Within
an activated MCR zone, if the MCR is on and there is power flow to a midline output coil; the
addressed bit is set to the current status of power flow. If the MCR is off, a logic "0" is written to the
specified address regardless of power flow status.

!--RELATED-POSTS-STARTS-->
Subscribe to:
Posts (Atom)